bread

Grilled Chicken Sandwiches

ChixSandwiches_v2_01.jpg

Enjoy a fully loaded grilled chicken sandwich! Perfectly grilled, juicy chicken is layered with elements of sweet, salty, tangy, and savory that will delight the senses. You won't believe how easily it comes together!

Grilled Chicken Sandwiches
Serves 4

Chicken and the Rub:
2 boneless chicken breasts, sliced in half
2 tablespoons olive oil
1/2 teaspoon Kosher salt
1/2 teaspoon fresh ground pepper
1/2 teaspoon ground cumin
1/4 teaspoon garlic powder
1/4 teaspoon paprika
1 teaspoon sugar

Sandwich Ingredients:
4 buns
4 tablespoons butter for buns
4 slices pepper jack cheese
1 avocado, sliced
1 ripe mango, sliced
4 ounces spinach
1/4 red onion, thinly sliced
BBQ sauce

Directions:
1. In a large bowl drizzle the chicken with the olive oil, and then rub with the spices (Kosher salt, pepper, cumin, garlic powder, paprika, and sugar) until well-coated on all sides. Preheat the grill.

2. Butter the buns on the inside of both the top and bottom, and prepare to grill by placing on a plate or platter to take out to the grill. Place the cheese on the side of the same plate, too.

3. Prepare the toppings for the sandwich. Halve, de-seed, peel, and slice the mango. Halve, pit, peel, and slice the avocado. Wash and spin dry the spinach leaves; remove stems as needed. Thinly slice the red onion.

4. Grill the chicken breast for 4-5 minutes and flip with grill tongs or metal spatula. Once the chicken breasts are almost done, place the cheese on top of each chicken breast, and allow the cheese to melt. Remove from the grill once the thickest part of the breast reaches 165 degrees F. Let the grilled breasts rest on a clean platter while grilling the buns.

5. Toast the buns on the grill until just golden brown.

6. Layer the toasted bun with a smear of BBQ Sauce, then add a layer of spinach leaves. Place the grilled chicken breast with melted cheese on top of the spinach. Add slices of avocado and mango, and top with slices of red onion. Drizzle more BBQ sauce on top. Finish the sandwich by capping it all with the top grilled bun. Enjoy!

Wilted Spinach Salad

Wilted-Spinach-Salad_V2_01.jpg

It's time to enjoy spring greens! Learn how to make the perfect soft-boiled egg and maximize your salad making skills with our take on a classic wilted spinach salad. Jammy eggs, crispy bacon, and wilted spinach come together with creamy goat cheese, crunchy breadcrumbs, and a tangy, fresh, warm dressing. Delicious!

Wilted Spinach Salad with a Perfect Soft-Boiled Egg
Makes 4 salads

Ingredients:
For the Breadcrumbs:

2 tablespoons butter
1 cup hearty (and slightly stale) bread, pulsed into breadcrumbs
1/4 teaspoon Kosher salt
1/4 teaspoon black pepper

For the Salad:
1/2 lb. bacon, fried and crumbled
4 eggs, soft-boiled and halved
2 lbs. fresh spinach or baby spinach
1/2 small shallot, thinly sliced
4 oz. goat cheese, crumbled into bite-sized pieces

For the Warm Bacon Dressing:
2 tablespoons reserved bacon fat
2 tablespoons olive oil
2 tablespoons apple cider vinegar
1 tablespoon fresh lemon juice
2 teaspoons Dijon mustard
1 teaspoon honey
1/4 teaspoon Kosher salt
1/4 teaspoon black pepper

Directions:
1. Prepare the Breadcrumbs: Making your own breadcrumbs is a snap! Toss a few slices of stale bread in a food processor and pulse into a fine texture. Spread the crumbs in a single layer on a sheet pan and and pop into a 300 degree oven for 10 minutes or until lightly toasted. (Watch carefully.) Once cooled, they're ready to use on salads or casseroles.

2. In a large skillet, melt the butter and toss with the breadcrumbs. Over medium heat, stir the breadcrumbs often and toast until golden brown. Season with Kosher salt and pepper. Remove from the pan and set aside.

3. Prepare the Bacon: In the same skillet, fry the bacon until crispy. Remove the bacon, and let cool on a paper towel-lined plate. Crumble. Reserve 2 tablespoons of the bacon grease for the dressing.

4. Prepare the Dressing: In a small saucepan, combine the rendered bacon fat with the olive oil, vinegar, lemon juice, Dijon mustard, honey, salt, and pepper. Heat the dressing until just warmed.

5. Prepare the Soft-boiled Eggs: Bring a saucepan filled halfway with water to boil. Add the eggs and boil for exactly six minutes. Remove immediately from the boiling water and cool slightly by running under cold water for about a minute. Peel and halve the eggs. Soft boiled eggs may be made ahead of time and kept in their shells and in the fridge for up to two days. To reheat, drop the pre-cooked eggs into boiling water for three minutes. Cool slightly, peel, and serve!

6. Assemble and Serve the Salad: Just before the eggs finish boiling, toss the spinach with the bacon crumbles, shallot, and the warm bacon dressing. Toss with tongs until the spinach begins to wilt slightly. Plate each dish with a serving of wilted spinach, one soft-boiled egg cut in half, a few crumbles of goat cheese, and a generous sprinkle of toasted breadcrumbs. Serve immediately and enjoy!

Spring Panzanella

Spring-Panz_V3_01.jpg

Is it spring yet? Bring it on with our snappy and colorful Spring Panzanella Salad! You’ll find it a satisfying dinner, or a delightful side salad. This healthy salad is packed with spring veggies like roasted asparagus, crunchy snap peas, and super-thin, sliced radishes. Further, this salad experience is elevated with homemade seasoned croutons, creamy goat cheese, a fresh tangy dressing, and tasty garnishes.

Spring Panzanella
Makes 2 large entrée salads, or 4 side salads

Crouton Ingredients:
2-3 cups cubed of rustic loaf of bread, cut into 1-1/2” cubes
2 tablespoons butter
2 tablespoons olive oil
1 teaspoon dried Herbes de Provence seasoning
1/4 teaspoon Kosher salt
1/4 teaspoon pepper

Salad Ingredients:
3-4 cups baby arugula
1 cup snap peas, sliced on the big angle
1/2 bunch asparagus, sliced into 1 inch pieces (tossed with olive oil, Kosher salt, pepper) 4 oz goat cheese, bite sized pieces
4 radishes, thinly sliced with mandoline

Vinaigrette Ingredients:
1/4 cup olive oil
1 tablespoon white wine vinegar
2 tablespoons fresh lemon juice (zest, and then juice)
1 teaspoon Dijon mustard
1/2 teaspoon Kosher salt
1/4 teaspoon fresh ground pepper
1 teaspoon Herbes de Provence
1 teaspoon shallot, minced
1 teaspoon honey

Garnish Ingredients:
lemon zest of 1 lemon
10 mint leaves, cut into a chiffonade

Directions:
1. Preheat the oven to 425 degrees F. Slice the asparagus into 1” pieces. Toss with one tablespoon of olive oil and salt and pepper. Roast the asparagus in a single layer on a baking sheet for 5 minutes, or until just crisp tender.

2. Prepare the cubed bread into semi-soft croutons. Melt the butter in a large skillet and mix with the olive oil. Toss the cubed bread in the skillet until evenly coated. Sprinkle with the Herbs de Provence, kosher salt, and pepper. Stir the croutons while heating until they are lightly toasted on all sides.

3. Meanwhile, prepare the snap peas by washing and cutting on a dramatic angle to reveal the peas inside.

4. Prepare the radishes by washing and cutting thin slices with a mandoline. Take care! Mandolines are super sharp, amazing tools that should be respected. We recommend to gear up for safety and use a protective glove AND the hand guard. The thin slices are so worth it!

5. In a small bowl or jar, whisk together all of the vinaigrette ingredients until emulsified.

6. Mix the salad together in a large bowl. Toss the arugula, sliced radishes, and asparagus with the dressing until coated.

7. Carefully layer in the snap peas and croutons. Top with bite-sized pieces of goat cheese and garnish with lemon zest and fresh mint.

Deep Dish Pizza

Who doesn’t love pizza??? Tonight it’s deep dish pizza on the menu! This deep dish version of pizza is inspired by a few unique pizza places that feature a partial cheese crust. Inside, delicious layers of flavor are assembled into some sort of pizza heaven. Fresh dough is topped with a layer of cheese, red onions, a robust red sauce, and finally, a hearty serving of spicy sausage - one slice is nearly enough!

Deep Dish Pizza - Sausage & Red Onion with a Crispy, Caramelized, Cheesy Crust
Makes two 12-inch deep dish pizzas - Serves 8

Dough Ingredients:
3/4 cup warm water
2-1/4 teaspoons (or one packet) yeast
1 tablespoon sugar
1 teaspoon kosher salt
2 tablespoons olive oil
2 tablespoons butter, melted
2-1/2 cups all-purpose flour

Pizza Toppings:
1 lb low-moisture mozzarella cheese, sliced in 1/8"-thick slices
8 ounces parmesan cheese, shredded
1 pound sausage, roughly rolled into 1" bite-sized discs
1/2 red onion, thinly sliced

Sauce Ingredients:
2 cloves garlic, minced
2 tablespoon olive oil
1 (28 oz) can petite diced tomatoes
1 (14oz) can crushed tomatoes
1 (6 oz) can tomato paste
2 teaspoons dried basil
2 teaspoons dried oregano
1 teaspoon dried marjoram
1/4 teaspoon fresh ground pepper
1 teaspoon Kosher salt
1 tablespoon sugar

Directions:
1. Prepare the pizza dough by hand or by using a stand mixer. Pour the warm water into a large bowl, and add the yeast. Stir slowly for about two minutes, then add the sugar, salt, olive oil, and melted butter and stir again until combined. Add 1 cup of flour, and stir until combined. Slowly add the remaining 1-1/2 cup of flour until a dough ball has formed. Knead the dough several times until a smooth ball has developed. Cover the dough with a damp cloth and let the dough rise in a warm location for about 1-1/2 hours.

2. Meanwhile, prepare the sauce. Sauté the garlic with the olive oil, stirring until fragrant. Be sure to watch this step carefully so that the garlic doesn't burn! Once the garlic is fragrant, add the diced tomatoes, crushed tomatoes, tomato paste, basil, oregano, marjoram, pepper, salt, and sugar. Bring the sauce to a low simmer and cook stirring as needed for 40-45 minutes or until the sauce has thickened nicely.

3. Use two well-seasoned 12" cast iron pans or deep dish pizza pans. Cover the surface with a generous layer of canola oil on the bottom and sides. Press the dough into the cast iron as a single flat layer and let the dough rise for an additional 30 minutes in the pan. (You can freeze half the ingredients for later.)

4. Preheat the oven to 500 degrees F.

5. Once the dough has risen in the pan, it's time to assemble the pizza. Make a layer of folded mozzarella slices all along the edge of the pan creating a "cheese crust" and then continue to layer on top of the layer of dough. Add the shredded parmesan on top of the mozzarella.

6. Spread the sliced red onions around the pizza on top of the cheese layers.

7. Add a hefty layer of pizza sauce to the pizza covering the onions completely.

8. Finally, top with pizza with the sausage discs.

9. Line a large baking sheet with aluminum foil to place on the oven rack directly below the pizza to catch any drips as the pizza cooks. Turn on a ventilation fan, and perhaps even crack a window. Any cheese that spills over will make a bit of a smoke.

10. Tent a loose piece of aluminum foil over the pizza. Bake for 20 minutes.

11. Check to make sure that the drip pan is correctly aligned to catch any spillage and continue baking for an additional 20-25 minutes or until the pizza crust is well set, the sausage is cooked, and the sauce and cheese below are bubbling hot. The sides of the crust that are made of cheese might look blackened, but they should not taste burnt, instead they will taste of delightful caramelized cheese and help to hold all of the ingredients in place.

12. Let the pizza cool slightly, enough to slide it from the pan onto a parchment paper-lined cutting board. Cut the pizza into slices with a sharp cook's knife working from the cheesy edge into the middle.

13. Pace yourself when enjoying - one pizza is hearty! One 12-inch pizza serves 4 hungry adults.

Roasted Garlic and Rosemary No-Knead Dutch Oven Bread

Bread. What’s not to love? A crunchy crust and soft, airy interior are just the beginning of our obsession. We love this recipe because it packs a serious flavor profile with minimal effort. It’s great for beginners, and takes less than three hours from start to a tasty finish. IN THIS ISSUE, we walk through the techniques of baking Dutch oven bread, and offer various success tips to inspire both novice and pro bakers alike!
Roasted Garlic and Rosemary No-Knead Dutch Oven Bread
Makes 1 loaf

Bread. What’s not to love? A crunchy crust and soft, airy interior are just the beginning of our obsession. We love this recipe because it packs a serious flavor profile with minimal effort. It’s great for beginners, and takes less than three hours from start to a tasty finish. A great recipe to inspire both novice and pro bakers alike!

Bread Ingredients:
1-1/2 teaspoon instant yeast
1-1/2 cups warm water (105° F)
1 teaspoon honey
1-1/2 teaspoon sea salt
2 tablespoons fresh rosemary, finely chopped
3 cups all purpose flour
1/2 teaspoon cornmeal
1 tablespoon olive oil, divided
1/2 teaspoon coarse/flaked sea salt

Roasted Garlic Ingredients:
1 head garlic
1 teaspoon olive oil

Directions:
1. Heat the oven to 400°F. Cut o the top of the garlic bulb to expose the cloves and place in a garlic roaster or a square of aluminum foil. Drizzle the garlic with the olive oil and cover. Or, in the case of foil, twist the corners at the top to prevent any oil drips during roasting. Roast for 30 minutes or until the cloves are soft and slightly browned. Remove from the oven and cool. Once cooled, use a small fork to remove the cloves from the head of garlic. Mash the soft cloves into a paste-like consistency.

2. Meanwhile, combine the yeast, water, and honey in a large mixing bowl. Let the mixture stand for about 5 minutes to allow the yeast to activate (the mixture should become slightly foamy.)

3. Add the mashed garlic, salt, and rosemary to the yeast mixture. Slowly add the flour to the mixing bowl in one cup increments, stirring with a wooden spoon until all the ingredients are incorporated. Do not over mix; the dough will be quite shaggy and sticky, yet will form a loose ball in the bowl.

4. Sprinkle the dough with a small amount of flour on top. Cover the bowl with a kitchen towel. Let the dough rise on the counter in a draft-free area for about 1 hour, or until it has roughly doubled in size.

5. On a lightly floured surface, with lightly floured hands, gently guide the dough into a ball. Place it back in the bowl, cover, and let the dough rise for another 30 minutes.

6. Preheat the oven to 450°F. Lightly coat the inside of an empty 5.5 qt. Dutch oven with 1/2 tablespoon of olive oil. Place the lid on the Dutch oven and put it in the middle of the oven. (Be sure to preheat the Dutch oven as the oven preheats; to avoid cracking of the pot’s enamel; never place a cold, empty Dutch oven in a hot oven.)

7. Lay a piece of parchment paper on the counter and sprinkle corn meal on the paper. Gently guide the risen dough out of the bowl and onto the parchment paper. Use the sides of the parchment paper to tip and coax the dough back into a circular form if it has lost its shape. Take care not to deflate the risen dough. Use oven mitts to remove the Dutch oven from the hot oven. Use the parchment paper to transfer the dough into the preheated Dutch oven. Brush the top with the olive oil. Use kitchen shears to cut an “X” on the top of the dough. Sprinkle the sea salt across the top.

8. Cover the bread with the Dutch oven lid. Use oven mitts to transfer the Dutch oven back into the oven. Bake for 30 minutes, until the bread is lightly browned. Remove the lid and cook for another 10 minutes, until the crust is nicely browned. The bread’s internal temperature should be between 195 - 210°F.

9. Cool on a cooling rack, then devour while warm, preferably with a healthy dose of butter and salt.

Fall Panzanella with Butternut Squash

Butternut squash is a fall favorite, and for good reason! This sweet, nutty vegetable is the perfect way to honor the changing of seasons. IN THIS ISSUE we slowly roast the squash until its edges crisp and caramelize, while the center remains soft and sweet. Paired with tart goat cheese, juicy raisins, and homemade croutons, this autumn version of a panzanella salad is dinner done well.

Panzanella Salad with Butternut Squash
Serves 6 - 8

Butternut squash is a fall favorite, and for good reason! This sweet, nutty vegetable is the perfect way to honor the changing of seasons. We slowly roast the squash until its edges crisp and caramelize, while the center remains soft and sweet. Paired with tart goat cheese, juicy raisins, and homemade croutons, this autumn version of a panzanella salad is dinner done well.

Ingredients:
1 small butternut squash
1/2 cup raw pumpkin seeds or 1/2 cup pepitas
2 tablespoons olive oil
1/4 teaspoon cayenne
1/4 teaspoon salt
1/4 teaspoon pepper
2 bunches kale
2 tablespoons butter
3/4 tablespoon Za’taar
1 French loaf, cut into 1” cubes
3 oz arugula
2 tablespoons raisins
4 oz goat cheese, crumbled
1/4 red onion, thinly sliced
Additional salt and pepper to taste

Dressing:
3 tablespoons olive oil
1/2 tablespoon balsamic vinegar
1 teaspoon red wine vinegar
1 clove garlic, minced
1/4 teaspoon salt
1/4 teaspoon pepper
1 teaspoon honey
1 tablespoon tahini

Directions:
1. Preheat the oven to 400°F. Wrangle the butternut squash by peeling, seeding and slicing it into 1” wedges. In a large bowl, toss the squash pieces with the raw pumpkin seeds, olive oil, cayenne, salt and pepper. Spread the mixture evenly on a roasting dish and roast for 40-45 minutes, turning the squash and seeds every 10 minutes until the squash is golden and tender. (If using pepitas, add to the roaster for just the last 5 minutes.) Remove from the oven.

2. Meanwhile, massage the kale in 1 tablespoon olive oil for about 2 minutes. Whisk together the dressing ingredients until all the ingredients are fully incorporated. Add half of the dressing to the kale, toss until the leaves are well-coated.

3. In a large skillet over medium-low heat, melt the butter and stir in the Za’taar seasoning. Add the cubes of bread and toss until croutons are evenly coated. Continue sautéing over medium heat until the croutons are golden and crispy.

4. Add the arugula to the kale, and top with the roasted butternut squash, pumpkin seeds, croutons, raisins, red onion, and crumbled goat cheese. Drizzle with the remaining dressing and season with additional salt and pepper to taste. Enjoy immediately.

Hot Artichoke Dip

Hot Artichoke Dip with Roll Ring
Fall Flavors Entree Salad
Hot Artichoke Dip with Roll Ring

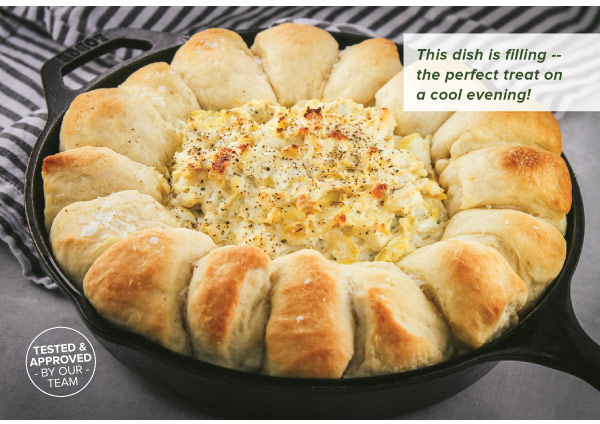
Looking for an easy and filling appetizer? This hot artichoke dip in a roll ring is sure to be a hearty crowd pleaser this holiday season! The super cheesy and flavorful dip is surrounded by warm, buttery rolls ready for dipping and enjoying. Makes one 10”-skillet, serves about 8-10.

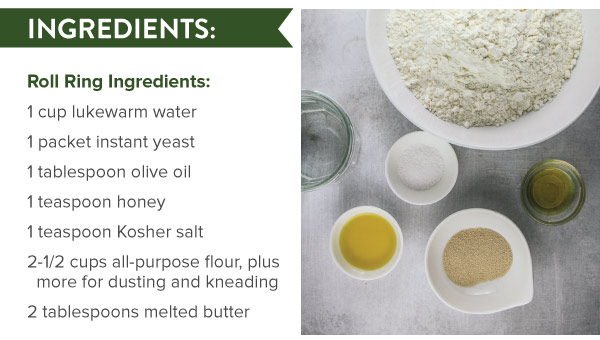
Roll Ring Ingredients:
1 cup lukewarm water
1 packet instant yeast
1 tablespoon olive oil
1 teaspoon honey
1 teaspoon Kosher salt
2-1/2 cups all-purpose flour, plus more for dusting and kneading
2 tablespoons melted butter for dipping rolls.

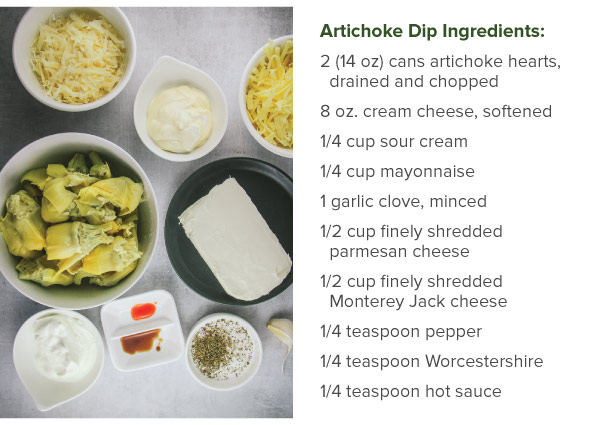
Artichoke Dip Ingredients:
2 (14 oz) cans artichoke hearts, drained and chopped
8 oz. cream cheese, well softened
1/4 cup sour cream
1/4 cup mayonnaise
1 garlic clove, minced
1/2 cup finely shredded parmesan cheese
1/2 cup finely shredded Monterey Jack cheese
1/4 teaspoon pepper 1/4 teaspoon Worcestershire
1/4 teaspoon hot sauce.

Directions:
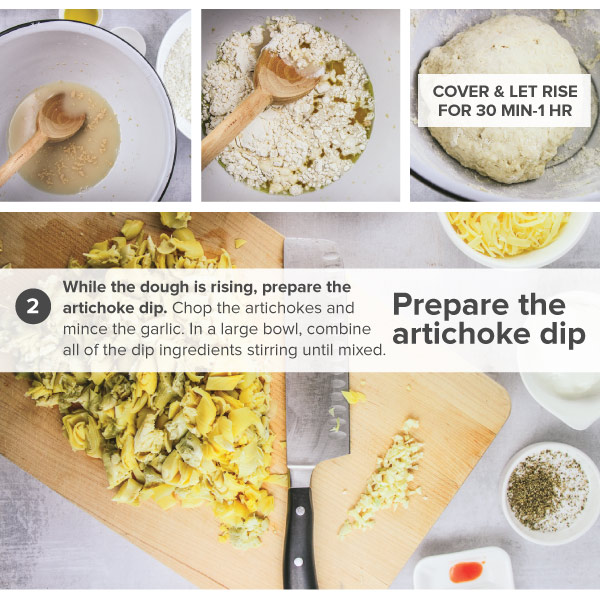
1. Prepare the roll ring dough. Add the yeast to warm water, and proof for 2 minutes (until a few bubbles begin to appear). Then add in the olive oil, honey, salt, and one cup of the flour. Mix together, then slowly add in the remaining flour; mix until a rough dough ball is formed. Transfer the dough to a floured surface. With the heel of your hand, knead the dough, adding flour as necessary to keep it from sticking. Knead until the dough turns into a smooth ball; place in an oiled bowl. Cover the bowl with a towel and let rise at room temperature until doubled in size, about 30 - 60 minutes.
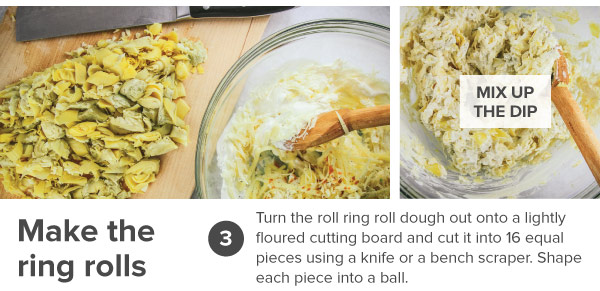
2. While the dough is rising, prepare the artichoke dip. Chop the artichokes and mince the garlic. In a large bowl, combine all of the dip ingredients and stir until well-mixed.
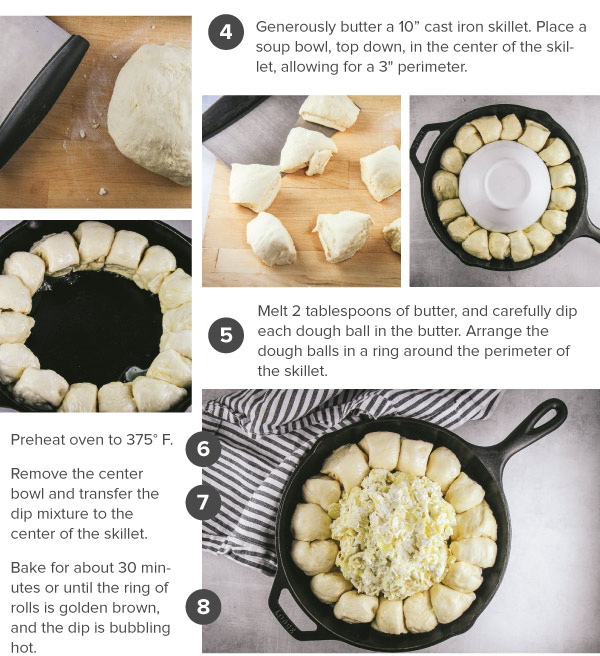
3. Turn the ring roll dough out onto a lightly floured cutting board and cut it into 16 equal pieces using a knife or a bench scraper. Shape each piece into a ball.
4. Generously butter a 10” cast iron skillet. Place a soup bowl, top down, in the center of the skillet, allowing for about a 3" perimeter around the sides.
5. Melt 2 tablespoons of butter, and carefully dip each dough ball in the butter. Arrange the dough balls in a ring around the perimeter of the skillet. Cover with a towel and let the dough rise until it has doubled in size, roughly 30 minutes.
6. Preheat the oven to 375° F. Remove the center bowl and transfer the mixed dip mixture to the center of the cast iron skillet. Bake for about 30 minutes or until the ring of rolls is golden brown, and the dip is bubbling hot. Remove from the oven and serve while warm.

Hot Artichoke Dip with Roll Ring